

")


Most homeowners have never been on their own roof, let alone watched a professional inspection happen. After a storm rolls through Chicagoland, you know you're supposed to get an inspection, but you don't know what that actually means. How long does it take? What are they looking for? What do you get at the end?
Here's exactly what happens during a storm damage roof inspection, step by step, based on the process our Haag-certified crews follow on every property.
It Starts on the Ground
Before anyone touches a ladder, the inspection begins at ground level. The inspector walks the entire perimeter of your home looking at soft metals: gutters, downspouts, HVAC units, window frames, garage doors, and any aluminum or copper surfaces exposed to the sky.
Soft metals dent more easily than roofing shingles, so they act as hail indicators. If your gutters show patterned denting on the top lip and your downspouts have impact marks on the exposed face, that confirms hail hit your property with enough force to damage harder materials above. This ground-level evidence is critical. It establishes that a damaging hail event affected your specific address, not just your zip code.
The inspector also checks siding, window screens, and fence tops. On vinyl siding, hail leaves circular impact marks or cracks. On wood fencing, it knocks off weathered surface material and exposes fresh wood underneath. Every impact point gets photographed with a reference marker for scale.
Getting on the Roof
Once the ground assessment is complete, the inspector sets up ladder access. Professional inspectors use OSHA-compliant ladder placement: extending at least 3 feet above the roofline, set at the correct angle, and secured at the base. On steeper roofs (8/12 pitch or higher), they'll use a ridge hook and harness system for fall protection.
Safety setup takes a few minutes, and it's a good sign. If an inspector free-climbs your roof with no safety gear, they're cutting corners on the thing that matters most. That approach to safety usually carries over to their inspection thoroughness. For pricing details at each level of service, see our roof inspection cost breakdown.
Free Storm Damage Inspection
Haag-certified inspectors. Full photo documentation. Insurance claim support from filing to final payment.
Get My Free InspectionOr call (630) 414-9160
The Systematic Roof Walk
A proper storm damage inspection doesn't just look at the part of the roof you can see from the driveway. The inspector walks every slope, starting from the ridge and working down to the eaves. Each slope faces a different direction and catches hail and wind at different angles, so damage patterns vary significantly from one side of the roof to the other.
On each slope, the inspector is looking for several things: displaced or missing granules, soft spots in the shingle mat (indicating fractures underneath), creased or lifted shingles from wind, cracked or broken shingles, and exposed fiberglass mat. They're also checking the condition of the sealant strips that bond each shingle to the one below it. Compromised sealant means the shingle will lift in future wind events even if it looks flat right now.
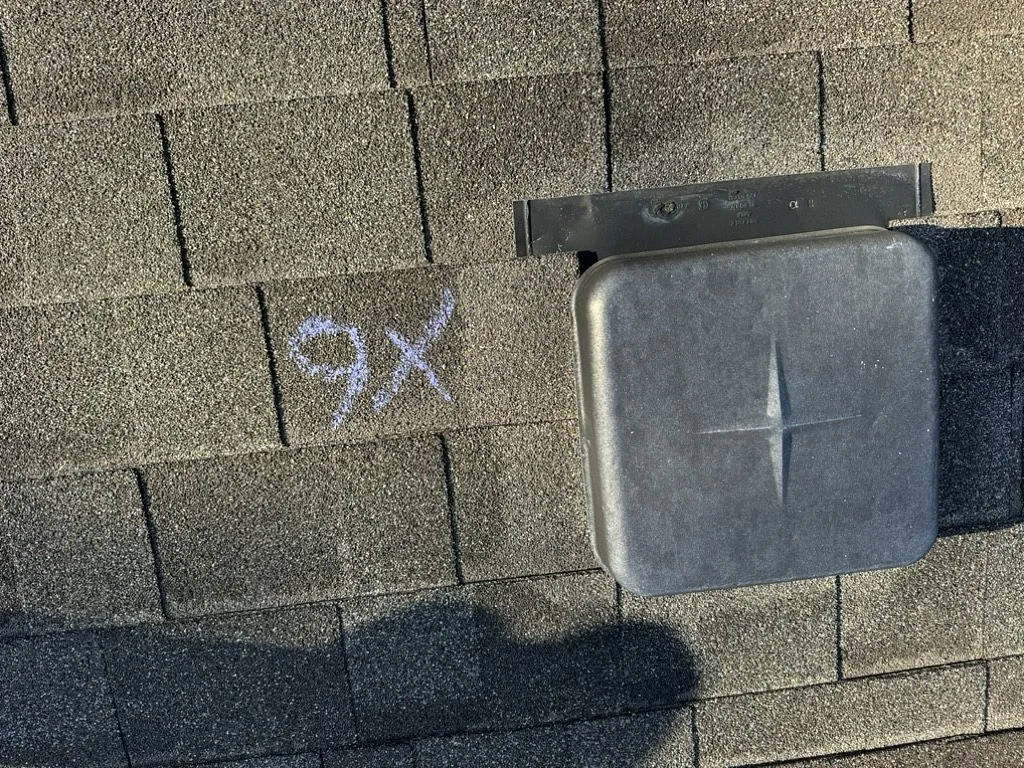
Hail Test Squares
This is the part of the inspection that separates a professional assessment from a quick look. The inspector marks a 10-foot by 10-foot square on the roof surface using chalk, then counts every hail impact within that square. This is called a hail test square, and it produces the objective data that insurance carriers need to determine whether your roof qualifies for repair or replacement.
Most carriers have a threshold, typically 8 to 10 impacts per test square, above which they'll approve a full replacement rather than spot repairs. For more on how this affects costs, see our roof inspection cost breakdown. The inspector runs test squares on multiple slopes because damage density varies with the direction the storm came from. The south-facing slope might have 15 hits per square while the north-facing slope has 3.
Each hail impact within the test square gets marked and photographed individually. The close-up photos show granule loss, mat exposure, and the circular pattern that distinguishes hail damage from foot traffic scuffing, blistering, or manufacturing defects. This level of documentation is what makes the difference between a claim that gets approved and one that gets denied.
Schedule Your Free Inspection
Haag-certified inspectors. Full photo documentation. Same-day report delivery. We cover all of Chicagoland, from the city to the far western suburbs.
Get My Free InspectionOr call (630) 414-9160
Checking Every Penetration
Roof penetrations are the most vulnerable points on any roof, and storm damage makes them worse. The inspector examines every pipe boot, plumbing vent, exhaust fan, skylight, and chimney. Pipe boots are rubber gaskets that seal around plumbing vents, and hail cracks them. A cracked pipe boot is a guaranteed leak path, sometimes immediately, sometimes during the next heavy rain.
Skylights get checked for cracked glazing, damaged frames, and compromised flashing. Chimney flashings, both the step flashing running up the sides and the counter-flashing embedded in the mortar, get inspected for separation, denting, or lifting. Every damaged penetration point is documented with wide-angle context photos and close-ups.
Ridge Caps and Flashing
Ridge caps sit at the highest point of the roof and take the most direct hail impacts. They're also the most exposed to wind. The inspector checks every ridge cap shingle for cracks, granule loss, and whether the nails are still holding. A ridge cap that's been struck by large hail often cracks right down the bend line where it folds over the ridge.
Wall junction flashings get special attention. Where the roof meets a wall (dormers, second-story walls, additions), the step flashing channels water away from the joint. Hail can dent and deform this flashing, creating gaps where water pools instead of shedding. Wind can lift it entirely. Damaged wall flashing is one of the most common sources of slow leaks after a storm.
Photo Documentation
Every finding gets photographed twice: once from a distance to show location context and once close-up to show the actual damage. A professional inspection on an average 20-square suburban roof produces 60 to 100 photographs. Each photo is geotagged and timestamped automatically.
The documentation methodology matters because it's what your insurance adjuster reviews when processing the claim. Adjusters at major carriers like State Farm, Allstate, and Country Financial are trained to evaluate specific types of evidence. A report with systematic, well-organized photo documentation moves through the claims process faster and with fewer disputes than a handful of blurry rooftop snapshots.
The Inspection Report
After the roof walk, the inspector compiles everything into a written report. A proper storm damage report includes the date and time of inspection, weather history for your area (confirming a storm event occurred), a section-by-section summary of findings, hail test square data with hit counts, measurements of affected areas in roofing squares, and the full photo set organized by roof section.
The report also includes a recommended scope of work: repair, partial replacement, or full replacement, with the specific materials needed. This scope is formatted so your insurance adjuster can compare it directly against their own estimate. When the contractor's scope and the adjuster's scope are in the same format, discrepancies are easier to identify and resolve.
We deliver the report the same day as the inspection, usually within a few hours. You get a digital copy via email and a walkthrough of the findings by phone or in person.
What Happens After the Inspection
If the findings don't match what a previous inspector told you, a second opinion inspection may reveal damage the first assessment missed. If the inspection confirms storm damage, the next step is filing your insurance claim. You'll call your carrier, report the date of loss (the storm event), and let them know you have a professional inspection report. The carrier assigns an adjuster who schedules their own visit to your property.
Your contractor should be present for the adjuster's inspection. This is called a "meet and greet" in the industry, and it's standard practice. Your contractor walks the roof with the adjuster, shows them the documented damage, and ensures nothing gets missed during the adjuster's assessment. Having your contractor there typically results in a more accurate scope from the adjuster.
From inspection to completed restoration, the timeline depends on your carrier's processing speed and material availability. Most Chicagoland storm damage claims take 2 to 6 weeks from filing to approval, with the actual roof work completed within a few days of approval. After major events like the March 2026 DuPage hailstorm, timelines stretch because every contractor and adjuster in the area is at capacity.